About Private VLANs
The private VLAN (PVLAN) feature addresses two problems that service providers face when using VLANs:
· The switch supports up to 1005 active VLANs. If a service provider assigns one VLAN per customer, this limits the numbers of customers the service provider can support.
· To enable IP routing, each VLAN is assigned a subnet address space or a block of addresses, which can result in wasting the unused IP addresses, and cause IP address management problems
PVLAN Overview
Using PVLANs provides scalability and IP address management benefits for service providers and Layer 2 security for customers. PVLANs partition a regular VLAN domain into subdomains. A subdomain is represented by a pair of VLANs: a primary VLAN and a secondary VLAN. A PVLAN can have multiple VLAN pairs, one pair for each subdomain. All VLAN pairs in a PVLAN share the same primary VLAN. The secondary VLAN ID differentiates one subdomain from another
For Complete Article Visit following Link
Use Case
In our case VLAN 10 is Remote Management VLAN i.e. we have allowed VLAN10 over IPSEC tunnel .We have Jumpbox VM per Customer which has 2 NICs, 1 within Customer Network and 2 in Remote Management Network (VLAN 10). As VLAN 10 is common network between Customers using PVLANs we will be block communication between Customers over VLAN 10
Configuration Overview
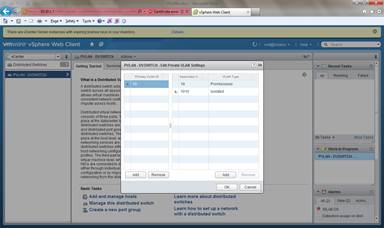
Primary VLAN ID – 10 192.168.7.0(/24)
Secondary VLAN ID – 1010. It will be isolated
Virtual Machines
VM 1 :- 192.168.7.18 (Promiscuous) :- DVPort Group as Promiscuous PG
VM2 :- 192.168.7.19 (Isolated) :- DVPort Group as Isolated PG
VM3: 192.168.7.20 (Isolated) :- DVPort Group as Isolated PG
Physical Switch Configuration
Primary VLAN Configuration
vlan 10
private-vlan primary
private-vlan association 1010
Secondary VLAN Configuration
vlan 1010
private-vlan isolated
Switch Port Configuration. In our case it is gi0/2
Configure the port as trunk and allow primary and secondary vlans
switchport mode trunk
switchport trunk allowed vlan 10,1010
Layer 3 Configuration & Connectivity for Primary vlan
interface vlan 10
ip address 192.168.7.1 255.255.255.0
private-vlan mapping add 1010
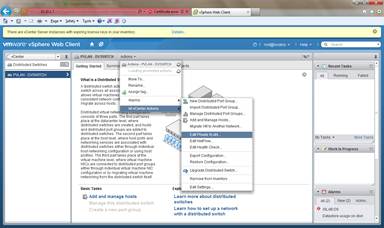
DVSwitch Configuration
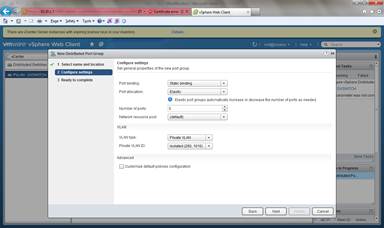
Create and configure PVLANs in dvswitch with VLAN 10 as primary and VLAN 1010 as isolated
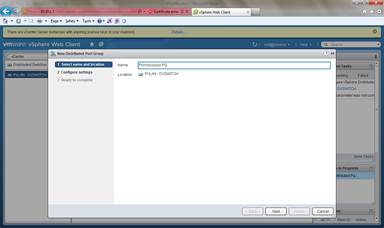
Create Port Group for the dvswitch as Promiscuous VLAN along with VLAN ID as PVLAN
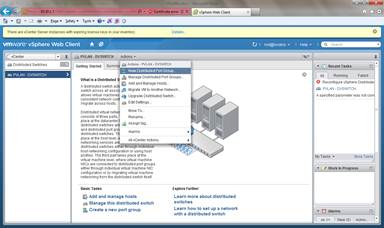
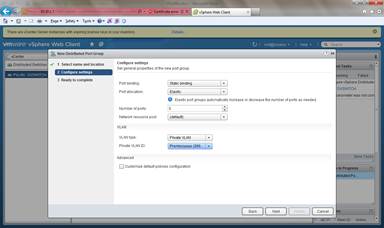
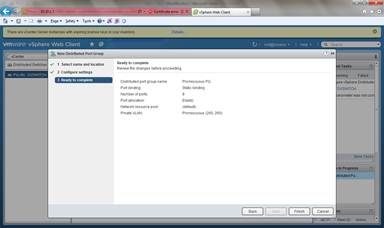
Create Port Group for ISOLATED VLAN along with VLAN ID as PVLAN


Map the VMs with the PortGroups
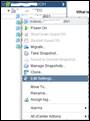
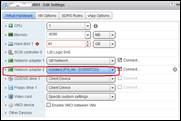
Edit the Settings for the all the 3 VMs and the Change the Network Label for the second NIC cards
Here we have changed the second NIC card to the Isolated PG for the Jumpbox VM
Assign IPs to the VMs and Test the functionality
Assign the IP Address as mentioned
VM 1 :- 192.168.7.18 (Promiscuous) :- DVPort Group as Promiscuous PG
VM2 :- 192.168.7.19 (Isolated) :- DVPort Group as Isolated PG
VM3: 192.168.7.20 (Isolated) :- DVPort Group as Isolated PG
Results
VM1 should be able to communicate to VM2 and VM3
VM2 should only communicate to VM1 not VM3
VM3 should only communicate to VM1 not VM2
I gather more information through this article, so please keep me informed of any update in this regard. For more relevant articles click on: how to recover deleted datacustom filedisk image softwareretrieve deleted files windowsdiskdiggerdiskdigger prousb drivedownload diskdigger