v\\:* {behavior:url(#default#VML);} o\\:* {behavior:url(#default#VML);} w\\:* {behavior:url(#default#VML);} .shape {behavior:url(#default#VML);}
![]()


![]()

![]()

![]()
![]()
![]()

![]()
![]()

![]()
![]()


Installing CloudStack without an Internet Connection
In order to install CloudStack where you don’t have access to internet (i.e. LAB Setup) we need to setup a local repository from the Cent-OS DVD
1. Ensure all the other default repos are disabled.
2. We need to create a repo file which includes the base url as media/centos6.2_final
Install the Management Server
1. Copy the CloudStack setup to the Base OS![]()
![]()
2. Unzip the file and start the installation using ./install.sh![]()
![]()
![]()
3. When the installation is finished, run the following commands to start essential services
Install the MySQL Database
1. Start the database installation using ./install.sh![]()
2. Edit the MySQL configuration (/etc/my.cnf or /etc/mysql/my.cnf, depending on your OS) and insert the following lines in the [mysqld] section. You can put these lines below the datadir line. The max_connections parameter should be set to 350 multiplied by the number of Management Servers you are deploying.
3. After editing my.cnf, restart the MySQL server, and then invoke MySQL as the root user. MySQL does not set a root password by default. It is very strongly recommended that you set a root password as a security precaution. Run the following commands, and substitute your own desired root password for .![]()
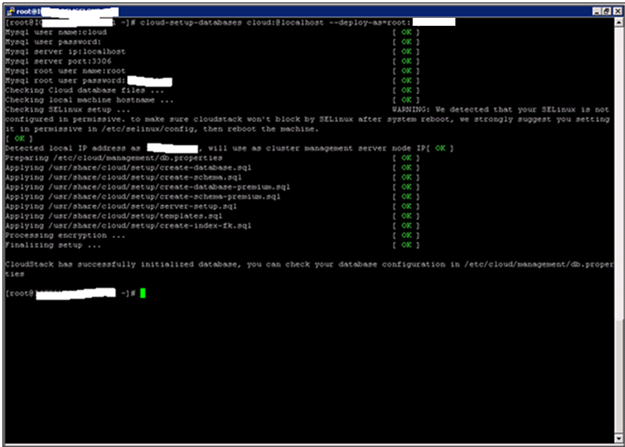
4. Set up the database. The following command creates the cloud user on the database.
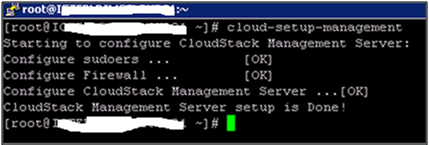
5. Configure the OS for the Management Server using the following command. This command will set up iptables, sudoers, and start the Management Server.

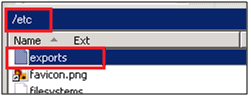
Prepare NFS Shares for Storage
CloudStack needs a place to keep primary and secondary storage. In a Basic Installation, it is typical to use the Management Server machine as an NFS storage server for both. This section tells how to set up the NFS shares before adding the storage to CloudStack.
1. On the Management Server host, create two directories that you will use for primary and secondary storage.


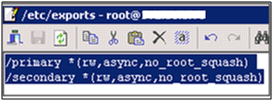
To configure the new directories as NFS exports, edit /etc/exports.
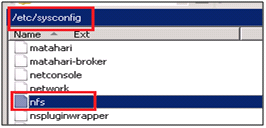
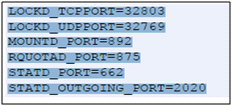
3. Edit the /etc/sysconfig/nfs file and uncomment the following lines.
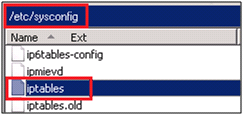
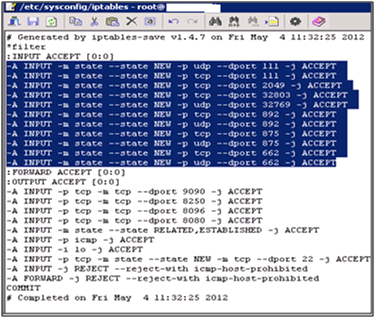
4. Edit the /etc/sysconfig/iptables file and add the following lines at the beginning of the INPUT chain.
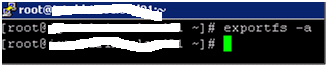
5. Run the following commands:
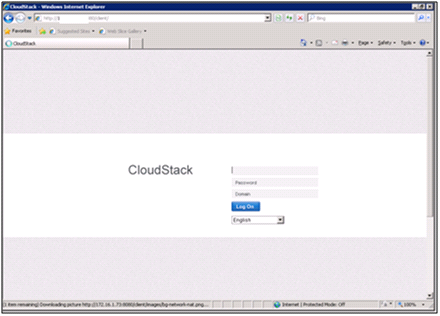
Log In to the CloudStack UI
After the Management Server software is installed and running, you can run the CloudStack user interface. This UI is there to help you provision, view, and manage your cloud infrastructure.
1. Open your favorite Web browser and go to this URL.
http://:8080/client
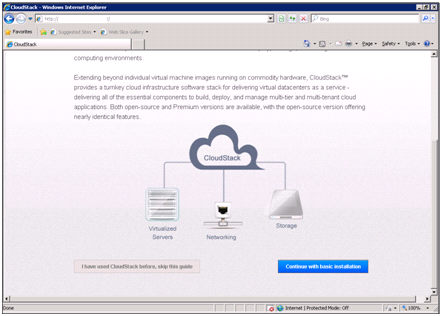
The default username and password are \”admin\” and \”password\”. Use these to login to the CloudStack UI. The first time you start the UI after a fresh Management Server installation, a guided tour splash page appears.

2. Choose “Continue with basic installation.” You\’re just trying CloudStack, and you want a guided walkthrough of the simplest possible configuration so that you can get started using CloudStack right away.
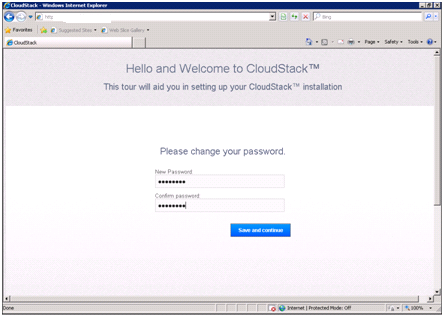
3. When prompted, choose a new password

Followed your steps for configuring local repo. but while installation of Cloudstack i am getting below error. its not using local repo.Please help******************************************************[root@XXX CloudStack-oss-3.0.2-1-rhel6.2]# ./install.shSetting up the temporary repository…Cleaning Yum cache…Loaded plugins: fastestmirrorCleaning repos: CentOS6.2-Repository base c6-media centosplus cloud-temp contrib : debug extras updates0 metadata files removedWelcome to the CloudStack Installer. What would you like to do?NOTE: For installing KVM agent, please setup EPEL yum repo first; For installing CloudStack on RHEL6.x, please setup distribution yum repo either from ISO or from your registeration account. M) Install the Management Server A) Install the Agent B) Install BareMetal Agent S) Install the Usage Monitor D) Install the database server (from distribution's repo) L) Install the MySQL 5.1.58 (only for CentOS5.x, Rhel6.x naturally has higher version MySql) Q) Quit > MInstalling the Management Server…Loaded plugins: fastestmirrorDetermining fastest mirrorsCould not retrieve mirrorlist http://mirrorlist.centos.org/?release=6&arch=x86_64&repo=os error was14: PYCURL ERROR 6 – \”Couldn't resolve host 'mirrorlist.centos.org'\”Error: Cannot find a valid baseurl for repo: base****************************************Thanks in advance
This comment has been removed by the author.
I gather more information through this article, so please keep me informed of any update in this regard. For more relevant articles click on: how to recover deleted datacustom filedisk image softwareretrieve deleted files windowsdiskdiggerdiskdigger prousb drivedownload diskdigger