Local deployment is a great way to improve your development speed, lower your cloud costs, and develop for the cloud when access is restricted. You have complete control over your environment by running your cloud app locally. That control makes it easier to reproduce results consistently and test new features.
In this blog, I will be deploying Localstack emulator on a Kubernetes Cluster (VMware VKS) and validate the following AWS services
- S3
- IAM
- SQS Queue
- ElasticSearch
What is LocalStack
LocalStack is an open-source tool that provides a fully functional local AWS environment for developing and testing cloud applications.It emulates various AWS services, from simple storage and database solutions to complex event-driven architectures and serverless applications. It replicates the AWS cloud environment on-prem, allowing developers to create and manage AWS resources without incurring any costs. For more details, you can visit https://www.localstack.cloud/
Benefits of Using LocalStack
Increase Dev Productivity
Allow your developers to focus their time and effort where it counts by developing and testing locally. Nobody likes setting up sandbox accounts, cleaning up resources or constantly monitoring AWS dev spending.
Cost Reduction
By eliminating the need for costly cloud resources during development and testing, LocalStack significantly reduces infrastructure costs. Developers can explore and experiment with different AWS services without worrying about incurring unnecessary expenses.
Seamless Integration
LocalStack ensures that your local development environment seamlessly integrates with the AWS infrastructure. This means that the code developed and tested using LocalStack can be seamlessly migrated to AWS without any modifications, reducing the risk of deployment issues.
Reduce Complexity
No dealing with complex permissions or deciding who gets a cloud account anymore. Since everything runs locally these concerns disappear. Work across different branches without having to update your infrastructure every time.
Isolated environment
Testing with LocalStack prevents you from accidentally affecting live AWS resources or production environments. This isolation makes it safe to experiment and test various configurations.
What are the use cases for LocalStack?
Local App development
Developers can explore and experiment with different AWS services without worrying about incurring unnecessary expenses. It provides almost the same feature parity and APIs as the real AWS cloud environment, minus the scaling and robustness, of course.
Continuous Integration
LocalStack enables teams to automate their application testing and integration process through DevOps practices, such as continuous integration (CI).
It lets you move away from complicated AWS testing and staging environments by enabling a key component of testing and delivering cloud-native applications
Security Testing
Security Testing in LocalStack allows you to test your IAM policies and permissions locally, resembling the AWS environment. Security Testing in LocalStack encompasses the following features:
- Enforce IAM policies & permissions in your setup to test your application security.
- Retrieve IAM policy engine logs to gain visibility into the policy evaluation.
- Discover appropriate permissions using IAM policy streams to fix logical errors.
Chaos Engineering
Chaos Engineering with LocalStack enables you to build resilient systems early on in the development phase.
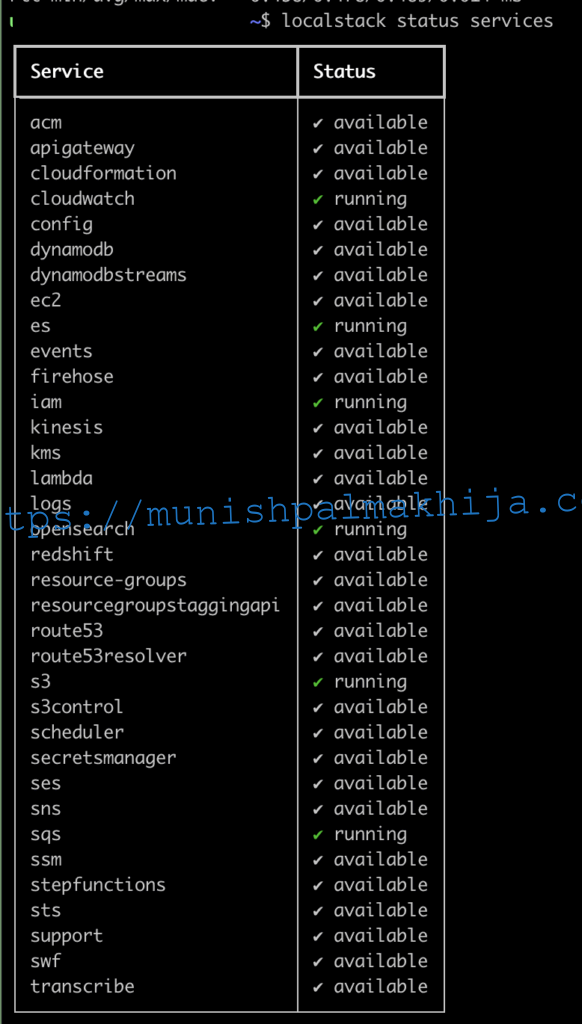
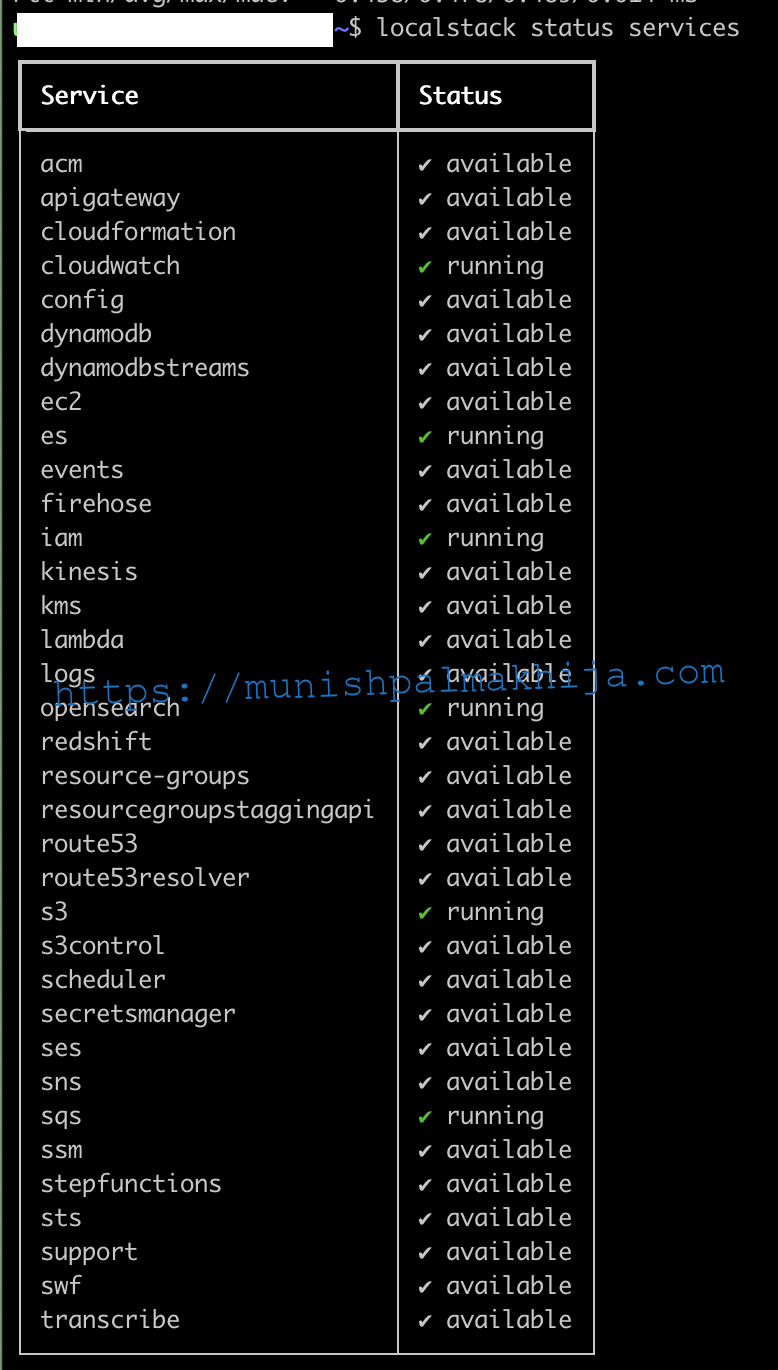
Supported AWS Services on LocalStack
The following AWS services are supported in the current (free) version installed in K8s cluster. You can refer the licensing doc for various Paid
LocalStack Deployment Procedure
There are multiple ways to install LocalStack. You can install in the following ways
- Localstack CLI
- LocalStack Desktop
- LocalStack Docker Extension
- Docker
- Helm
In this blog, I will be using a Helm chart to deploy it on the Kubernetes Cluster and ensure it is available via Load Balancer.
This means you can offer AWS as a Service to internal teams
Step 1 – Create a Namespace
kubectl apply -f- << EOF
apiVersion: v1
kind: Namespace
metadata:
name: <namespace_name>
labels:
pod-security.kubernetes.io/enforce: privileged
EOF
Step 2 – Add Helm Chart Repo
$ helm repo add localstack https://localstack.github.io/helm-charts
Step 3 – Get the Values file in your working directory
helm show values localstack-repo/localstack > localstack-values.yaml
A couple of points to note
- By default, it created a K8s service with Node Port; however, in my lab, I have modified it to type LoadBalancer
- The default node port is 31566; however, I ran into an issue and had to change it to 31581. It may not be applicable for all
Step 4 – Install Chart
helm upgrade –install localstack localstack-repo/localstack -n <namespace_name> -f localstack-values.yaml
Step 5 – Verify LocalStack Pods
kubectl -n <namespace_name> get pods
In my environment, I have deployed 1 replica however, you can modify the count based on your requirement

Create AWS Services on LocalStack
I have validated the following services in my lab environment
- S3
- IAM
- SQS Queue
- ElasticSearch
Pre-requistie
Once Localstack is deployed, you need to do the following
- Install AWS CLI and configure it using aws configure. You can use dummy values, as localstack doesn’t validate, but it needs to be present
- Fetch the LoadBalancer IP
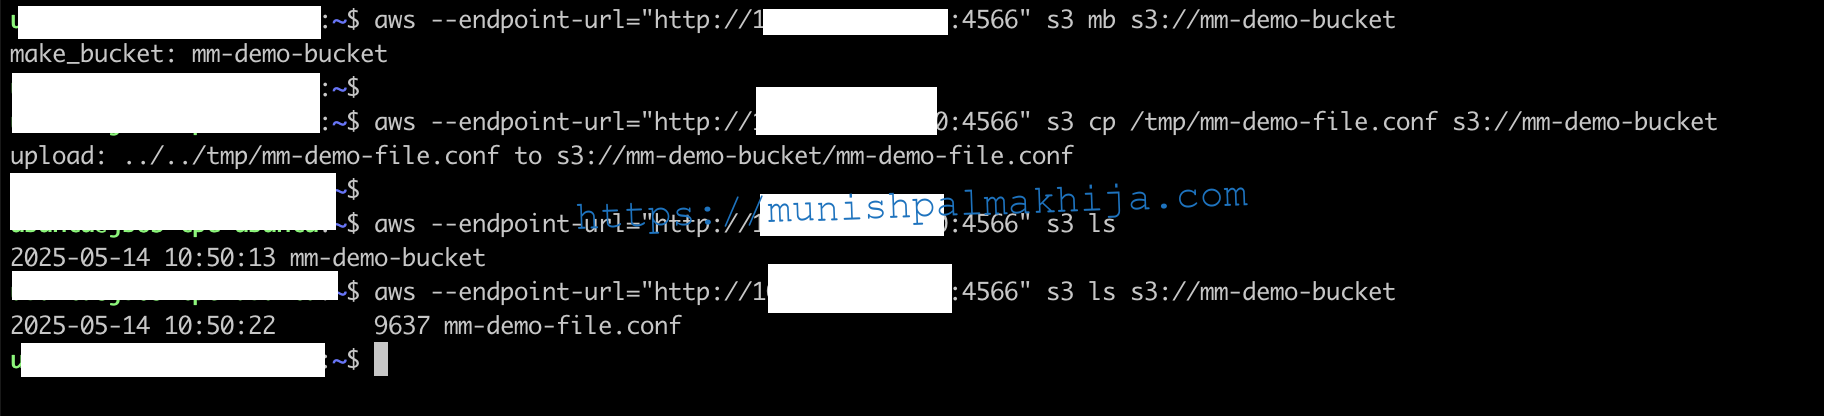
Create & Manage S3 Bucket
aws –endpoint-url=”http://<LB_IP>:4566″ s3 mb s3://mm-demo-bucket
aws –endpoint-url=”http://<LB_IP>:4566″ s3 cp /tmp/mm-demo-file.conf s3://mm-demo-bucket
aws –endpoint-url=”http://<LB_IP>:4566″ s3 ls s3://mm-demo-bucket

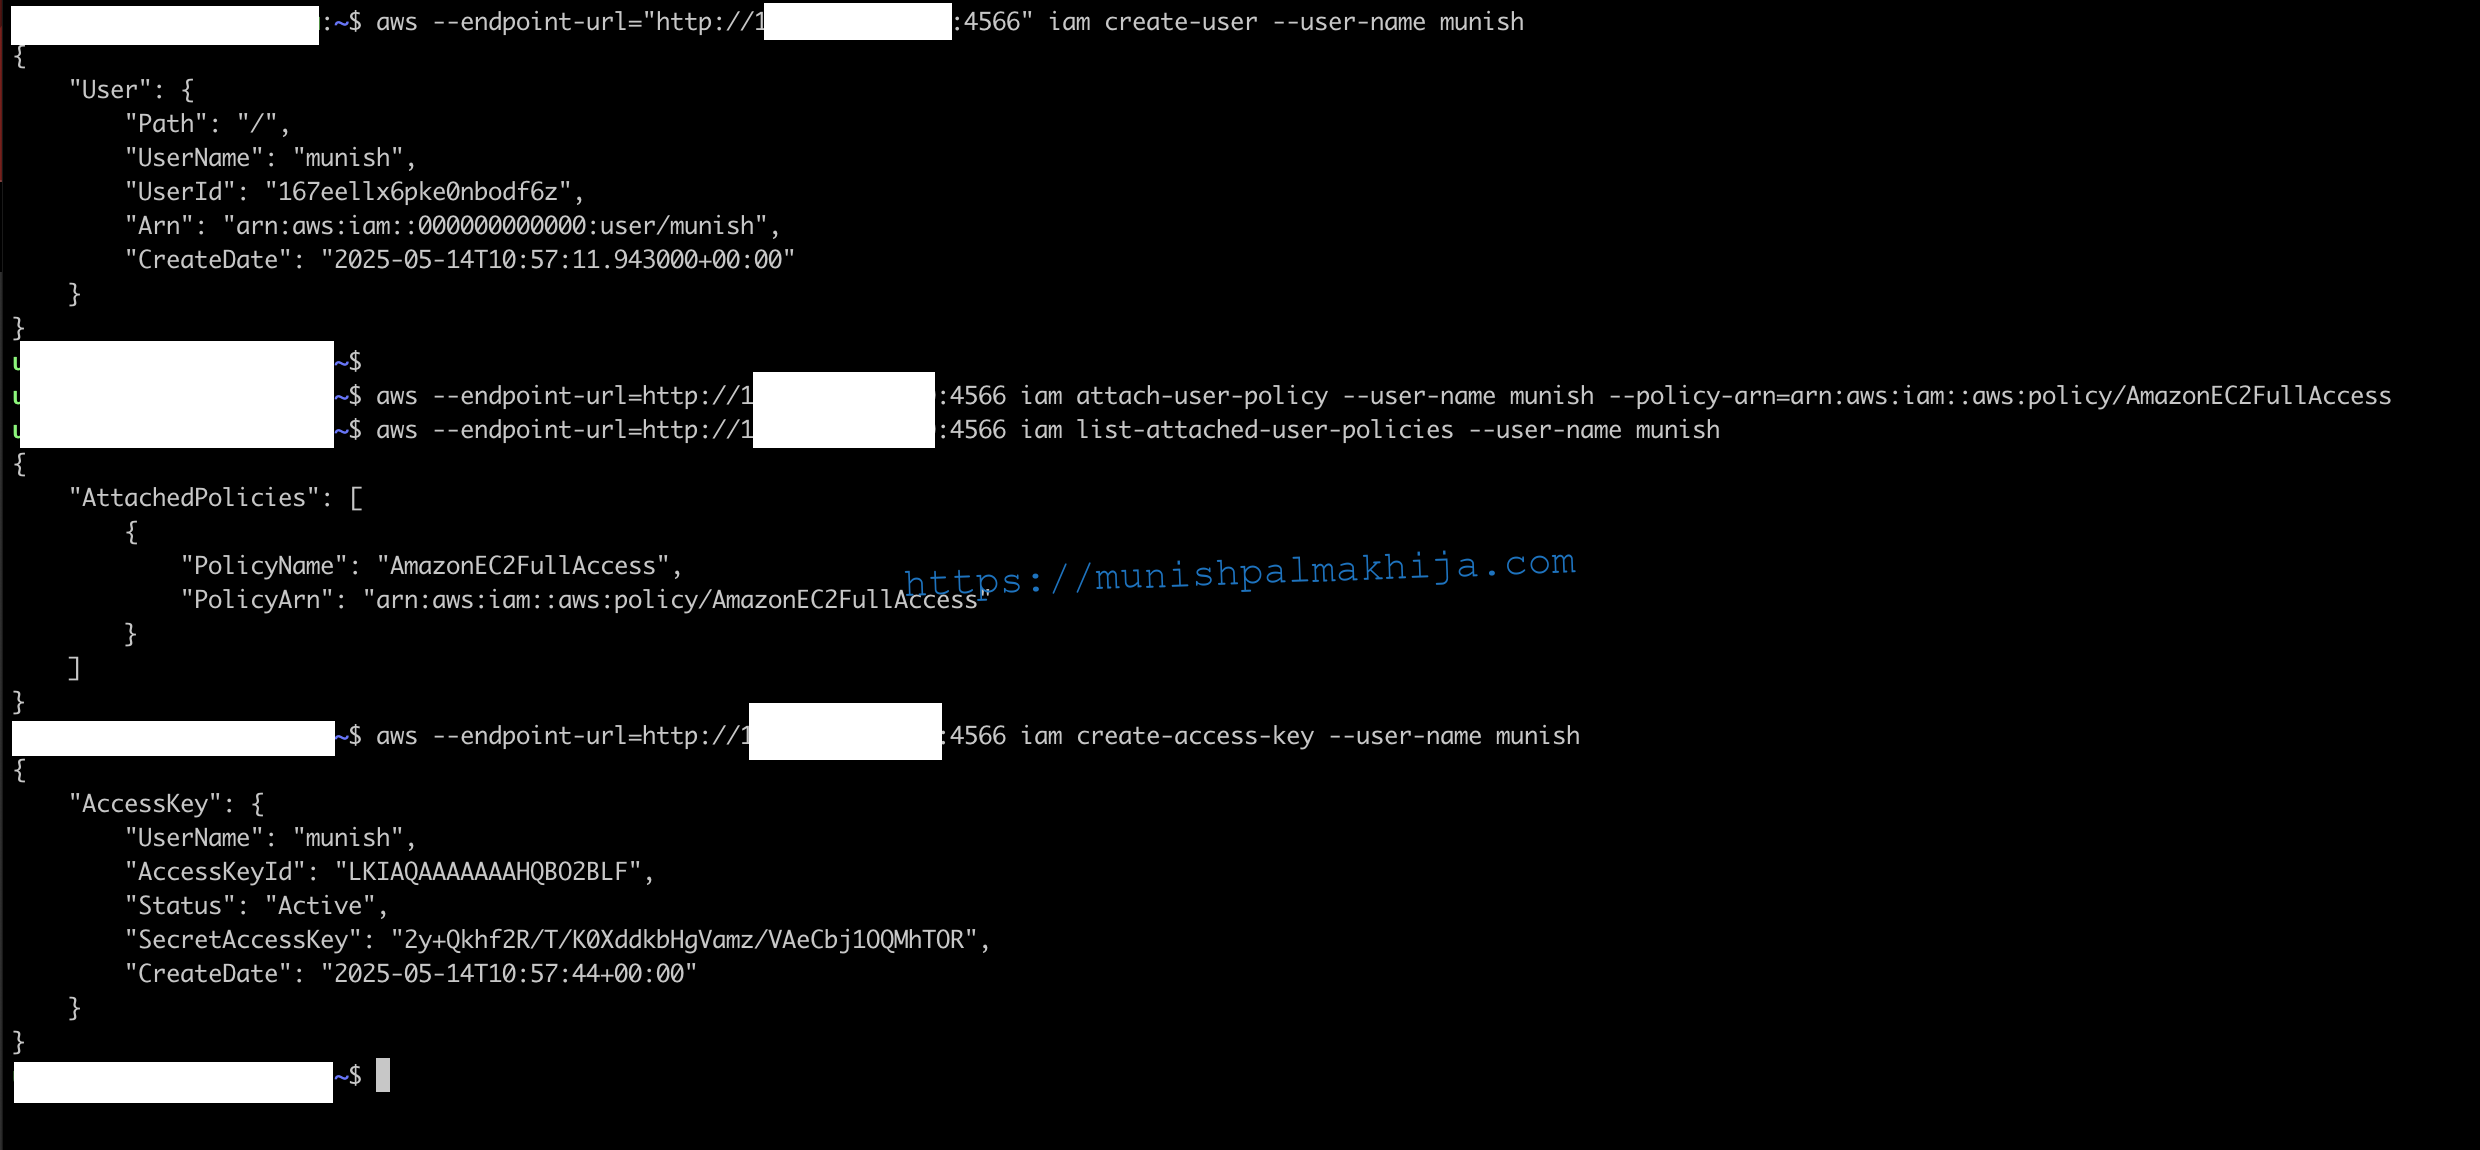
Create & Manage IAM Service
aws –endpoint-url=”http://<LB_IP>:4566″ iam create-user –user-name munish
aws –endpoint-url=http://<LB_IP>:4566 iam attach-user-policy –user-name munish –policy-arn=arn:aws:iam::aws:policy/AmazonEC2FullAccess
aws –endpoint-url=http://<LB_IP>:4566 iam list-attached-user-policies –user-name munish
aws –endpoint-url=http://<LB_IP>:4566 iam create-access-key –user-name munish
Create SQS Queue
aws –endpoint-url=”http://<LB_IP>:4566″ sqs create-queue –queue-name mm-queue
aws –endpoint-url=http://<LB_IP>:4566 sqs send-message –queue-url http://sqs.us-west-2.localhost.localstack.cloud:4566/000000000000/mm-queue –message-body “hellofrommunish”
aws –endpoint-url=”http://<LB_IP>:4566″ sqs list-queues

Create ElasticSearch
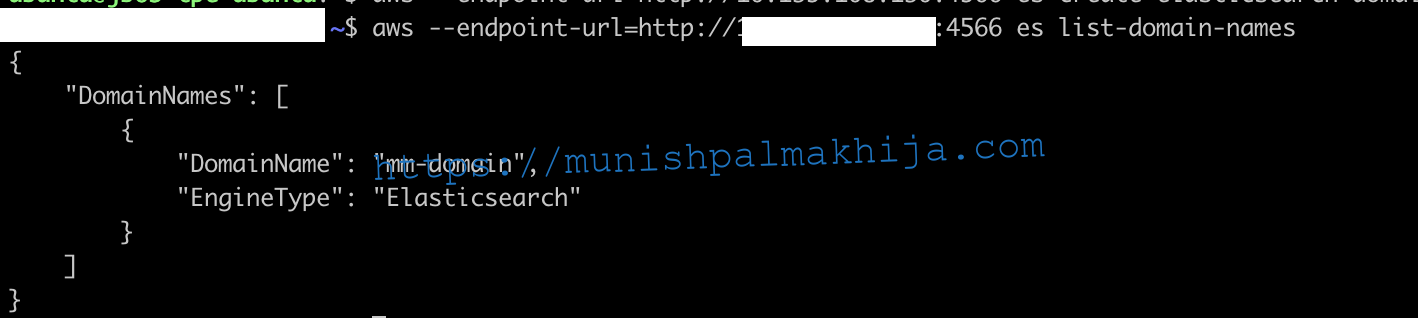
aws –endpoint-url=http://<LB_IP>:4566 es create-elasticsearch-domain –domain-name mm-domain –elasticsearch-version 7.10
aws –endpoint-url=http://<LB_IP>:4566 es list-domain-names
aws –endpoint-url=http://<LB_IP>:4566 es describe-elasticsearch-domain –domain-name mm-domain | jq “.DomainStatus.Processing”
It might take 5-10 minutes to enable the ElasticSearch service. You will need to wait until Domain Status Processing is false.

While waiting, you can view the logs in the LocalStack pod

Once provisioned, you will need to have a local entry for accessing the Elastic Search via the URL published on stdout
<LB_IP> mm-domain.us-west-2.es.localhost.localstack.cloud
curl http://mm-domain.us-west-2.es.localhost.localstack.cloud:4566
curl -s http://mm-domain.us-west-2.es.localhost.localstack.cloud:4566/_cluster/health | jq .

Conclusion
Utilizing LocalStack for local development provides a highly effective and efficient development workflow. It can help reduce dependencies on external services during development, which not only cuts costs but also accelerates the development cycle.